Showing posts with label AWS VPC. Show all posts

Tuesday, June 20, 2023

Build a developer environment with AWS and Terraform


Terraform AWS provider

terraform {
  required_providers {
    aws = {
      source  = "hashicorp/aws"
    }
  }
}

Creating a provider.tf file in a dev environment is done by creating a text document and naming it “provider.tf”. This file can then be placed in the root directory of the development project. Once the file is created, you can copy and paste the code provided above into the file.

When creating the provider.tf file, it is important to remember to remove the version information from the code. This will allow the file to be used for different versions of the software being developed.


Shared Credential files provider

provider "aws" {

region                              = "us-east-1"

        shared_credentials_files = "~/.aws/credentials"

         profile                            = "vscode"

}

Copy and paste it in the providers.tf and change the


In order to open a new terminal and enter the command "terraform init," follow these steps:

1 Open the terminal by pressing Ctrl + Shift +  `

  1. Enter the command "terraform init"
  2. Press the Enter key to execute the command.

You should see a confirmation message that the initialization succeeded. You can now use terraform to create and manage resources.


In VS Code, we need to add resources to a file called main.tf. To do this, we can use the following code:

        resource "aws_vpc" "ct_vpc" {

        cidr_block = "10.123.10.10/16"

        enable_dns_hostnames = true

        enable_dns_support = true

        tags = {

                Name = "dev"

    }

        }


To execute the above code, we will use Terraform Plan. This will provide us with data regarding the resources that will be deployed in the AWS Dev environment. This information will include the type of resources, such as EC2 instances, Auto Scaling groups, S3 buckets, etc., as well as the necessary configurations for those resources. This data will be used to ensure that the deployment of the resources is successful and that the end result is as expected. The Terraform Plan will also provide us with a preview of the resources that will be created in the AWS Dev environment, so we can review and validate the changes before the deployment is completed. Once the Terraform Plan is executed, the resources will be deployed in the AWS Dev environment.


Running the terraform apply command will initiate the actual execution of the Terraform code written in the configuration files. This command will create or modify the resources according to the configuration files. It will begin by displaying a plan of the planned operations and will then prompt for confirmation before proceeding further. After confirmation, it will create the necessary resources. Terraform will then display the state of the resources after execution.


To connect to your AWS resources and manage them using VS Code, you'll need to open the AWS icon on the left menu of VS Code. From there, select the appropriate profile for the resources you want to manage. If you want to manage an Amazon Elastic Compute Cloud (EC2) Virtual Private Cloud (VPC), select the AWS::EC2::VPC profile. Once you've connected to the resource, you'll be able to see important information, such as the VPC ID and other details related to the VPC.


After successfully connecting to the resource, you will be able to see the VPC ID, which is a unique identifier assigned to the Virtual Private Cloud. With this information, you can then access and manage other important aspects of the VPC such as the subnets, security groups, and route tables. Additionally, you can also view the VPC's IP address range, which defines the range of IP addresses used by the VPC. This range can be customized to fit the specific needs of your organization, providing greater control and flexibility over your network infrastructure.


Type terraform state list to show all the resources in AWS.


Terraform show is a command that displays the current state of your infrastructure resources. This includes the resources that are currently being managed by Terraform, such as Amazon Web Services (AWS) resources. It can show the details of the resources by retrieving their attributes from the current state. By using this command, you can check the configuration of the resources that Terraform is managing and ensure that they are up to date and in line with your desired state. Furthermore, you can use the output of the Terraform show command to help troubleshoot any issues that may arise with your infrastructure resources. Therefore, it is a useful command to know and utilize as a part of your infrastructure management toolkit.


Let's delete the VPC that we have created. This process will remove the virtual private cloud from our network infrastructure. After deleting the VPC, any resources that were associated with it will no longer be available in the system. Therefore, it is important to make sure that all necessary data and resources have been transferred to another VPC or storage location before proceeding with the deletion process. Additionally, it is essential to check and ensure that there are no dependencies or connections to the VPC from other systems or applications that may be affected by the deletion. Once all necessary preparations have been made, we can proceed with the deletion process by navigating to the VPC management console and selecting the option to delete the VPC.


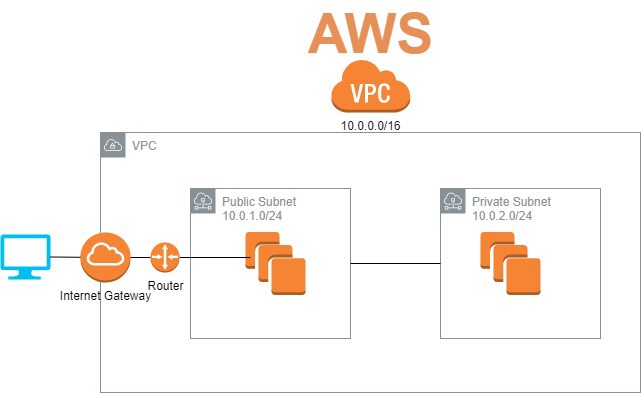
To create a public subnet using Terraform, follow these steps:

  1. Define the VPC and subnet resources in your Terraform code.
  2. Set the "map_public_ip_on_launch" attribute of the subnet to "true".
  3. Associate the subnet with a route table that has an internet gateway as a target.
  4. Apply the Terraform code to create the subnet.

After these steps, you should have a public subnet in your infrastructure that can be used for hosting resources with public-facing IP addresses.

            resource "aws_subnet" "ct_public_subnet" {

                 vpc_id = aws_vpc.ct_vpc.id

                  cidr_block = "10.123.1.0/24"

                  map_public_ip_on_launch = true

                  availability_zone = "us-east-1a"

                  tags = {

                        Name = "dev-public"

                      }

                }


Run terraform run and check whether the given parameters are present.

After verifying the resources run terraform apply to run resources on the instance This will create the resources specified in the terraform configuration.

AWS can be accessed from the left menu of VS code. Select resources and click on settings, then add AWS::EC2::subnetNetworkAclAssociation and then click on OK.


now add internet gateway to the vpc by adding resource of igw to the main.tf file. enter the below terraform code to add resources. Run terraform plan and terraform apply to see the changes

resource "aws_internet_gateway" "ct_internet_gateway" {

      vpc_id = aws_vpc.ct_vpc.id

      tags = {

            Name = "dev-igw"

          }

}


Similarly, you can add an aws internet gateway to the resources menu as mentioned above.

In order to flow traffic to the VPC and Internet gateway, let us create a route table. We need two resources to add this time. Please paste the following code to add resources.

        resource "aws_route_table" "ct_public_rt" {
              vpc_id = aws_vpc.ct_vpc.id

              tags = {
                    Name = "dev_public_rt"
                  }
           }

            resource "aws_route" "default_route" {
                  route_table_id = aws_route_table.ct_public_rt.id
                  destination_cidr_block = "0.0.0.0/0"
                  gateway_id = aws_internet_gateway.ct_internet_gateway.id
            }

You can now run the Terraform plan and apply to add resources. To view the details of the route table, add the route table to the menu of the Amazon Web Services resources in Visual Studio Code.


we are going to bridge the gap between route table and subnet by providing route table association. write below code and run terraform plan and terraform apply

        resource "aws_route_table_association" "ct_public_association" {
              subnet_id         = aws_subnet.ct_public_subnet.id
              rouroute_table_id = aws_route_table.ct_public_rt.id
            }


A very important resource is now being added to AWS and it is the security group.

Add the following code to main.tf for incoming and outgoing traffic For ingress, we need to use the IP address of the access computer, which can be a user's IP address, and egress should be 0.0.0.0/0 for outbound traffic to any machine. and run terraform plan and apply respectively.

        resource "aws_security_group" "ct_sg" {
              name        = "dev-sg"
              description = "dev security group"
              vpc_id      = aws_vpc.ct_vpc.id

              ingress {
                from_port   = 0
                to_port     = 0
                protocol    = "-1"
                cidr_blocks = ["0.0.0.0/0"]
              }

              egress {
                 from_port   = 0
                 to_port     = 0
                 protocol    = "-1"
                 cidr_blocks = ["0.0.0.0/0"]
              }


We now need to add an EC2 instance to our AWS account, so I'm using an Ubuntu server running on EC2. To do this, we must copy the ami ID, which is underlined in the image below.


paste the ami id under ec2→AMIs and search. now copy the owner number.


copy the ami name from details below.


Now create a new file in vs code as datasources.tf and copy the below code in vs code and change owner according to you and paste AMI name in filter value and change the ending server number with * . After making changes run terraform plan and terraform apply.


        data "aws_ami" "server_ami" {

                most_recent = true

                owners = ["099720109477"]


                filter {

                      name = "name"

                      values = ["ubuntu/images/hvm-ssd/ubuntu-jammy-22.04-amd64-server-*"]

                    }

                }


Lets create a public key using built-in key generator by using following command

type as:

C:\\Users\\Chait/.ssh/"any name" hit enter.

  1. ssh-keygen -t ed25519 hit enter.

now type as ls ~/.ssh . now ctkey.pub is my public key.


add key pair to the main.tf file with new resource name and mention public key and run terraform plan and terraform apply.

I would like to add a new instance to our AWS account and define the AMI, Key_name, VPC_security_group_ids, and subnet_id as shown below. The user can also change the default volume provided by the AWS account by adding root_block_device, the volume of which is 10GB, to the instance.

        resource "aws_instance" "dev_node" {
              instance_type = "t2.micro"
              ami           = data.aws_ami.server_ami.id

              tags = {
                    Name = "dev-node"
              }

              key_name               = aws_key_pair.ct_auth.id
              vpc_security_group_ids = [aws_security_group.ct_sg.id]
              subnet_id              = aws_subnet.ct_public_subnet


              root_block_device {
                volume_size = 10
              }


add user data as below mentioned into a new file and name it as userdata.tpl to vs code for installation of docker on ec2 instance.
#!/bin/bash 
sudo apt-get update -y && 
sudo apt-get install -y \
apt-transport-https \ 
ca-certificates \ 
curl \ 
gnupg-agent \ 
software-properties-common && 
curl -fsSl https://download.docker.com/linux/ubuntu/gpg | sudo apt-key add -&& 
sudo add-apt-repository "deb [arch-amd64] https://download.docker.com/linux/ubuntu $(lsb_release -cs) stable" && 
sudo apt-get update -y && 
sudo sudo apt-get install docker-ce docker-ce-cli containerd.io -y && 
sudo usermod -aG docker ubuntu

    resource "aws_instance" "dev_node" {
          instance_type = "t2.micro"
          ami           = data.aws_ami.server_ami.id
          key_name               = aws_key_pair.ct_auth.id
          vpc_security_group_ids = [aws_security_group.ct_sg.id]
          subnet_id              = aws_subnet.ct_public_subnet.id
          user_data = file("userdata.tpl")
          root_block_device {
                volume_size = 10
              }
   
          tags = {
                Name = "dev-node"
              }
        }


ssh into the ec2 instance using below command.

ssh -i C:\\Users\\Chait\\.ssh\\ctkey [ubuntu@100.26.150.177]

create a new file for configuration name it as windows-ssh-config.tpl

    add-content -path c:/users/Chait/.ssh/config -value @'

    Host ${hostname}

      hostName ${hostname}

      User ${user}

      IdentityFile ${identityfile}

      '@


In main.tf add provisioner in that add hostname, user and identityfile as mentioned below


    provisioner "local-exec" {

            command = templatefile("windows-ssh-config.tpl", {

              hostname     = self.public_ip,

              user         = "ubuntu",

              identityfile = "~/.ssh/ctkey"

            })

            interpreter = ["Powershell", "-command"]

          }

        }

after making changes run the terraform code as terraform apply -replace aws_instance.dev_node

now in terminal enter command as cat ~/.ssh/config


in command palette search for ssh and click on connect to host.


copy the host Ip address and paste in the remote ssh. Select Linux because ours is a ubuntu machine after there is a pop showing as continue hit on continue.


User can see that vs code had ssh into the Ec2 instance.


now users can share files remotely and has full access to ec2 instance.


hit on trust and user can view the directory of ubuntu files


here is my Ec2 Instance connected to the vs code.


after completing the whole process destroy the resource which we have create for that enter the command as terraform destroy -auto-approve

we have now successfully created developer environment using AWS and terraform.

Friday, August 28, 2020

VIRTUAL PRIVATE CLOUD(VPC) USING AWS

Creating a Virtual Private Cloud(VPC) using AWS


Problem statement

In AWS if you have ec2 instances  created across different availability zones of a region, there will not be connectivity across instances with in AWS network . by default we have to use public IP connect from one instance of one availability zone to another instance of another availability zone .there are couple of disadvantages with this approach

  1. Traffic is routed through pubic network which is not a safe option
  2. Since public internet is used there is a bandwidth cost associated
  3. Slow network connection
  4. Unless you use elastic IP your public IP change every time the instance is restarted 

As a solution to above mention disadvantages AWS provides virtual private network service-virtual private cloud(VPC). We can create a virtual private network and use VPC peering to bring all instances across all availability zones in same region under one network

Different services that required as part of VPC creation are :

  •  VPC
    •  Subnets
    •    Routing table
    • Internet gateway
    • vpc
  • Security groups
  • Ec2 instance
  • putty

     brief introduction about above mentioned services:

  1. What is a vpc?
  • VPC is a virtual private cloud which helps us to connect multiple instances or servers ate a time in region VPC is mostly used for internal communications it does not use public IP

      2. What are subnets?
  • Subnets can be simply said as range of IP addresses
    • /8 - 225.0.0.0
    • /9 - 255.128.0.0
    • /10 - 255.192.0.0
    • /16 - 255.255.0.0
    • /24 - 255.255.255.0      
      3. What is a routing table?
  • Routing tables consists set of rules which allows network traffic from subnets or gateway is desired once
     4. What is internet gateway?
  • Internet gateway is used to provide access point for routing table which allows internet and perform network address translation (NAT)
  • IPv4 - it is a 32-bit number which consists less range than IPv6
  • IPv6 - it is a 128-bit  and it is bigger that it can many no of IP ranges which will never end or the user doesn’t require that many

Process of creating a VPC and communication between two servers
creating a vpc(Virtual Private Cloud)
1. we need to create a VPC under network and content delivery

Mention name and IP range and enable DNS hostnames it assigns name for the server for that right click ok AWS in edit DNS hostnames enable and save 

2. Now go to subnets and create a subnet

Name as shown above and create 

Again create a another subnet to expand our VPC subnet naming as above and availability zone as (ap-southeast-1b) and IPv4 as 10.1.2.0/24

create a subnet shown above by this our VPC is expanded to 3 availability zones

For brief explanation IP ranges are

10.1.1.0/24 – 10.1.1.0 to 10.1.1.255

10.1.1.0 – network ID

10.1.1.255 – Broadcast ID

10.1.1.1,2,3 – used by AWS for gateways

Instances will run from 10.1.1.4 to 10.1.1.254

Enable auto assign for all the subnets by right click

3. Now create a internet gateway and attach to VPC

Create a gateway naming as above after that the gateway will be in the detached mode we need to attach to our VPC

Attach the created VPC 

4. Create a routing table and assign IGW and subnets to it

Routing table helps to communicate servers with IGW using routing table

Go to subnet associations and add 2 subnets in routing table and leave dbserver for communication between servers

Create another routing table for db server

Add dbserver

Go to edit Routes in routing table and route under destination as 0.0.0.0/0-which can access any IP

Do same for second routing table

5. Create a security group and allow traffic

Create a security group as shown above and edit inbound rules and allow all traffic and save rules

6. Now create a keypair

Now go to the EC2 instance and go to key pairs

Create key pair as AWS_VPC or your wish it should be in ppk 

Save the file to the desired location 

7. Deploy a Instance(VM) and access using putty

Now launch instance in EC2 and select amazon linux2 and instance type as t2.micro

Select network as created VPC and subnets as AWS-webservers and primary IP as 10.1.1.111

Under configure security group select existing security group and select AWS-allow-all and launch the instance

Select existing key pair which was created above

Above private IP is used for internal communication and public IP is used by the user

Now open putty

Copy this and past in putty as ec2-user@ ec2-13-250-97-44.ap-southeast-1.compute.amazonAWS.com

Go to Auth under SSH and place your security key and click on open 

Now your connected to your ec2 instance

Now type as sudo su – it will go to root access 

Now create a another instance and add dbserver in configuration 

We are trying to communicate between server1 and server2

Now follow the same steps involved in putty for server 1

It shows same for server2 as shown in the server1

Now ping server1 from server2 using IPaddress of server1

Use command as ping and IP address of server1 that is 10.1.1.111 so that we can see the servers are communicating with each other

Now do the same process but it should be from server1 to server 2

By this process we know that servers are communicate with each other from one availability zone to another one in the same region