Creating a Virtual Private Cloud(VPC) using AWS
Problem statement
- Traffic is routed through pubic network which is not a safe option
- Since public internet is used there is a bandwidth cost associated
- Slow network connection
- Unless you use elastic IP your public IP change every time the instance is restarted
As a
solution to above mention disadvantages AWS provides virtual private network
service-virtual private cloud(VPC). We can create a virtual private network and
use VPC peering to bring all instances across all availability zones in same
region under one network
Different services that required as part of VPC creation are :
- VPC
- Subnets
- Routing table
- Internet gateway
- vpc
- Security groups
- Ec2 instance
- putty
brief introduction about above mentioned services:
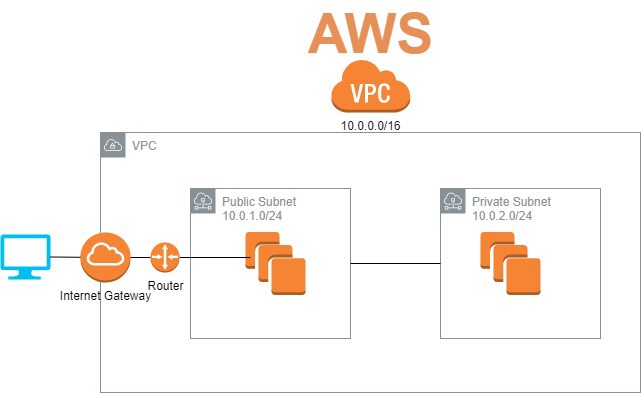
- What is a vpc?
- VPC is a virtual private cloud which helps us to connect multiple instances or servers ate a time in region VPC is mostly used for internal communications it does not use public IP
- Subnets can be simply said as range of IP addresses
- /8 - 225.0.0.0
- /9 - 255.128.0.0
- /10 - 255.192.0.0
- /16 - 255.255.0.0
- /24 - 255.255.255.0
- Routing tables consists set of rules which allows network traffic from subnets or gateway is desired once
- Internet gateway is used to provide access point for routing table which allows internet and perform network address translation (NAT)
- IPv4 - it is a 32-bit number which consists less range than IPv6
- IPv6 - it is a 128-bit and it is bigger that it can many no of IP ranges which will never end or the user doesn’t require that many


Mention name and IP range and enable DNS hostnames it assigns
name for the server for that right click ok AWS in edit DNS hostnames enable
and save


2. Now go to subnets and create a subnet


Name as shown above and create

Again create a another subnet to expand our VPC subnet
naming as above and availability zone as (ap-southeast-1b) and IPv4 as
10.1.2.0/24

create a subnet shown above by this our VPC is expanded to 3
availability zones
For brief explanation IP ranges are
10.1.1.0/24 – 10.1.1.0 to 10.1.1.255
10.1.1.0 – network ID
10.1.1.255 – Broadcast ID
10.1.1.1,2,3 – used by AWS for gateways
Instances will run from 10.1.1.4 to 10.1.1.254
Enable auto assign for all the subnets by right click


3. Now create a internet gateway and attach to VPC


Create a
gateway naming as above after that the gateway will be in the detached mode we
need to attach to our VPC


Attach the
created VPC

4. Create a routing table and assign IGW and subnets to it
Routing
table helps to communicate servers with IGW using routing table


Go to
subnet associations and add 2 subnets in routing table and leave dbserver for
communication between servers

Create
another routing table for db server

Add
dbserver

Go to edit
Routes in routing table and route under destination as 0.0.0.0/0-which can access
any IP


Do same for
second routing table
5. Create a security group and allow traffic

Create a security group as shown above and edit inbound rules and allow all traffic and save rules

6. Now create a keypair
Now go to
the EC2 instance and go to

Create key
pair as AWS_VPC or your wish it should be in ppk

Save the
file to the desired location
7. Deploy a Instance(VM) and access using putty
Now launch instance in EC2 and select amazon linux2 and instance type as t2.micro


Select
network as created VPC and subnets as AWS-webservers and primary IP as
10.1.1.111


Under
configure security group select existing security group and select AWS-allow-all
and launch the instance

Select
existing key pair which was created above


Above
private IP is used for internal communication and public IP is used by the user
Now open
putty

Copy this
and past in putty as ec2-user@
ec2-13-250-97-44.ap-southeast-1.compute.amazonAWS.com

Go to Auth
under SSH and place your security key and click on open

Now your
connected to your ec2 instance
Now type as
sudo su – it will
go to root access

Now create
a another instance and add dbserver in configuration

We are
trying to communicate between server1 and server2
Now follow
the same steps involved in putty for server 1
It shows
same for server2 as shown in the server1

Now ping server1 from server2 using IPaddress of server1

Use command
as ping and IP address of server1 that is 10.1.1.111 so that we can see the
servers are communicating with each other
Now do the
same process but it should be from server1 to server 2

By this
process we know that servers are communicate with each other from one availability
zone to another one in the same region


No comments:
Post a Comment